The Workshop
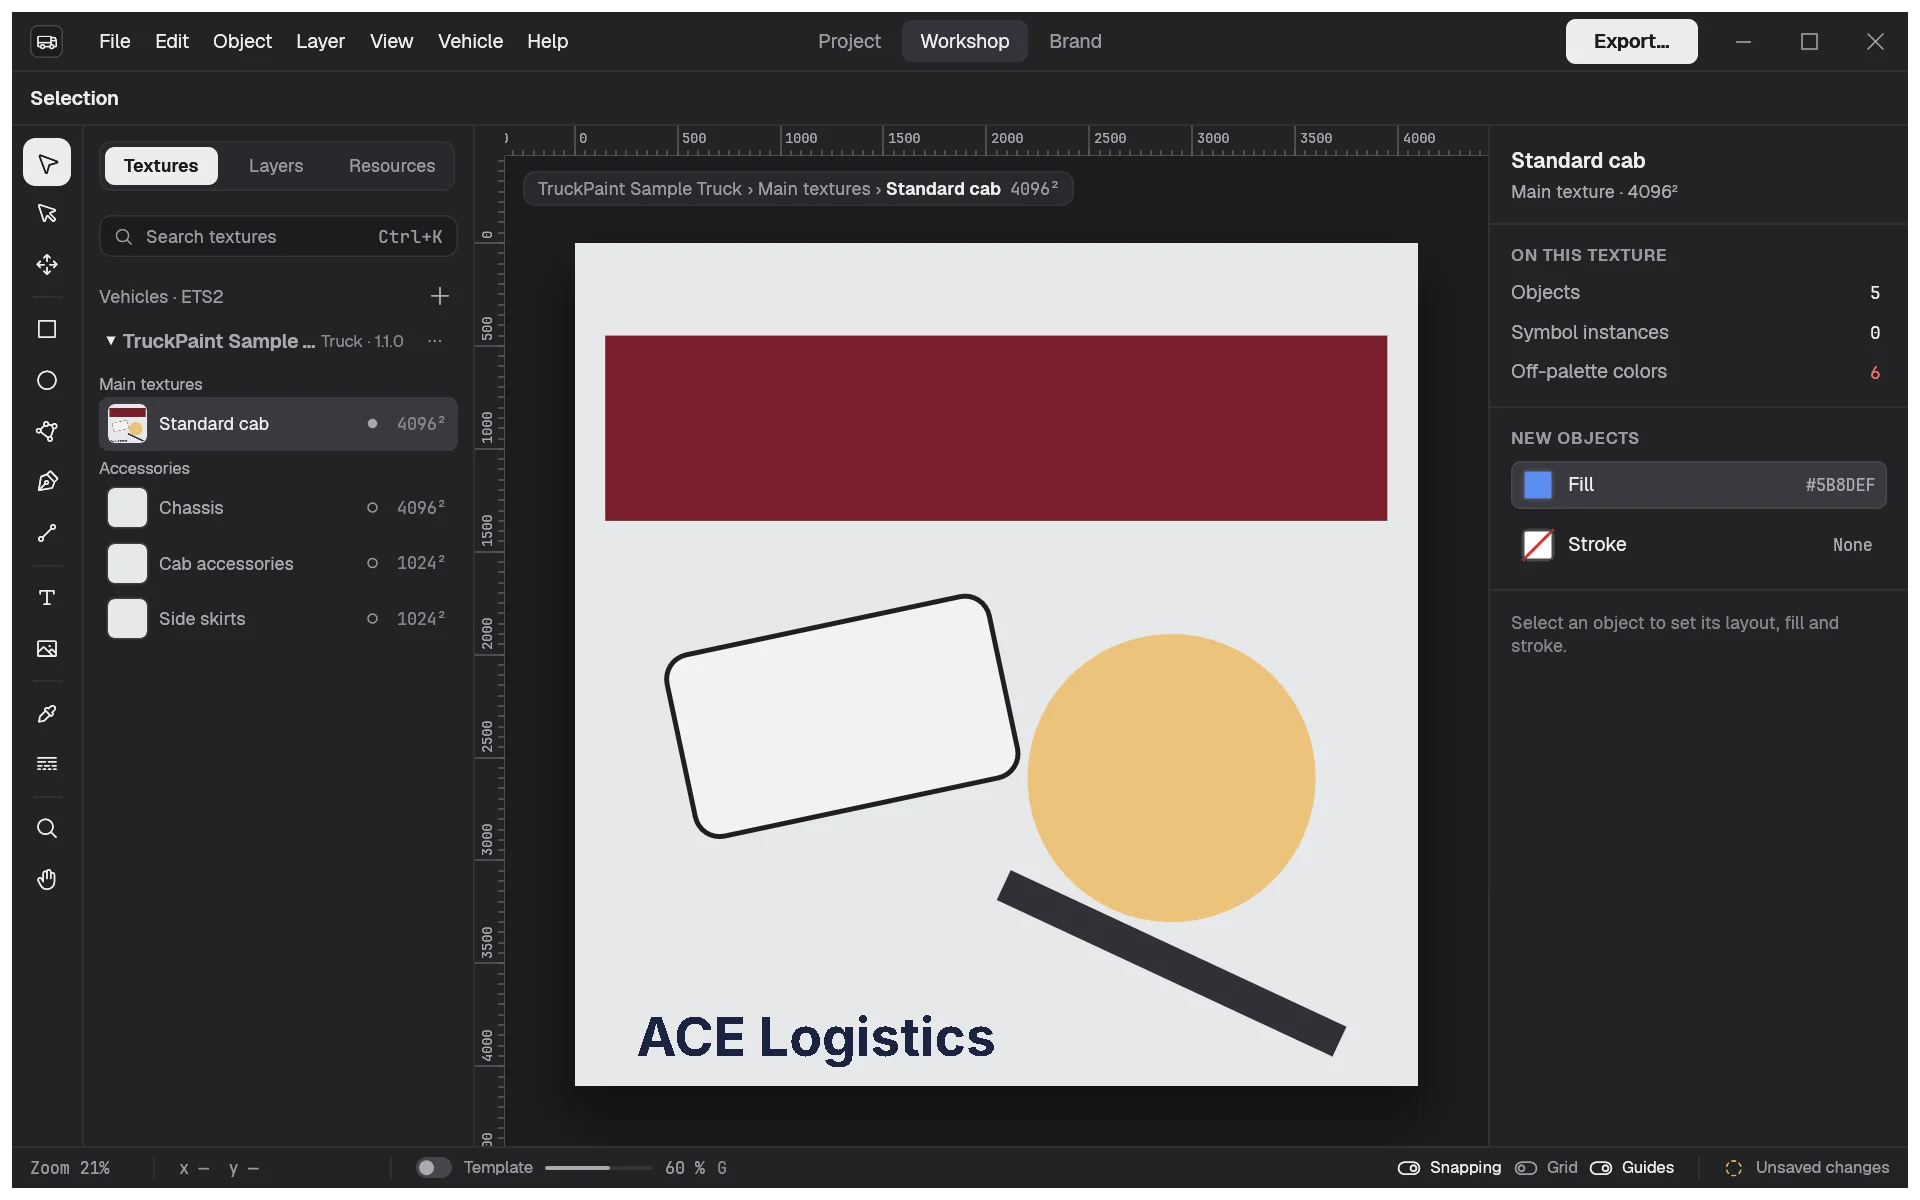
The Workshop is where you paint. TruckPaint is a livery editor: you always work on one texture of a vehicle at a time, in texture pixels, on top of that texture’s template (the UV layout of the vehicle). Everything you draw on a texture is what the game gets as that texture when you export.
The three spaces
Section titled “The three spaces”The switcher in the top bar moves between the three spaces of a project. Switching never changes your work, your selection or your undo history.
| Space | What you do there | Shortcut |
|---|---|---|
| Project | your fleet and the mod information | Ctrl+1 (⌘1 on macOS) |
| Workshop | painting the active texture | Ctrl+2 |
| Brand | the palette, styles, symbols and images of the whole project | Ctrl+3 |
Opening a project shows the Project space; click a texture there to paint it in the Workshop. The Export… button at the right of the top bar is always there: it runs Export Mod… (see Export the mod).
The parts of the Workshop
Section titled “The parts of the Workshop”From left to right:
- The tool rail. One icon per tool. Hover a tool to see its name and its shortcut. See Drawing tools.
- The left panel, with three tabs:
- Textures (key 1): your fleet as a tree. Click a texture to paint it. A breadcrumb in the corner of the canvas always tells you which vehicle and texture you are on, and its size.
- Layers (key 2): the objects of the active texture. See Layers.
- Resources (key 3): the project’s palette, symbols, styles and images, ready to drag onto the canvas. The Brand space manages them.
- The canvas, with rulers along its top and left edges, graduated in texture pixels.
- The inspector, on the right. It shows the settings of what is selected: Layout, Text, Appearance and more. With nothing selected, it shows the active texture (its kind and size), a summary On this texture, and the fill and stroke used for new objects.
Above the canvas, the tool options bar shows the name of the active tool, and the settings of the Polygon tool when it is active. You can drag the edge of the left panel or the inspector to resize them.
To make room, choose View › Hide Panels (Tab): the left panel and the inspector disappear, the tool rail and the bars stay. Press Tab again to bring them back. View › Reset Workspace puts the panels back at their default widths.
The template overlay
Section titled “The template overlay”The template is drawn over your artwork as a locked guide: you can’t select or move it, it is not in the Layers tab, and it is never exported. Press G, or choose View › Show Template, to hide or show it. Set its opacity (60% by default) next to the Template toggle in the status bar. Both settings are kept per texture.
The status bar
Section titled “The status bar”At the bottom, the status bar shows the zoom level, the pointer position in texture pixels, the template settings, the Snapping, Grid and Guides toggles, and whether the project is Saved or has Unsaved changes.
Zoom and move around
Section titled “Zoom and move around”| To | Do this |
|---|---|
| Zoom toward the pointer | mouse wheel, pinch, or Ctrl + scroll |
| Pan | two-finger scroll on a trackpad, Shift + wheel (horizontally), hold Space and drag, drag with the middle button, or use the Hand tool |
| Zoom In / Zoom Out | Ctrl+= / Ctrl+- |
| Fit to Screen | Shift+Ctrl+0 |
| Actual Size (100%) | Ctrl+0 |
At 100%, one texture pixel is one screen pixel. With the Zoom tool, click to zoom in, Alt-click (Option-click on macOS) to zoom out, or drag a rectangle to zoom onto it.
Undo anything
Section titled “Undo anything”Every change to the drawing can be undone: Edit › Undo (Ctrl+Z) and Redo (Ctrl+Shift+Z or Ctrl+Y). The menu names the step, such as “Undo Resize”. A whole drag counts as one step. Zooming, panning and selecting are not recorded, so undo never moves your view.